Every computer repair shop has a waiting room full of people who come in with a single problem: “I can’t update Windows, it says there isn’t enough disk space,” or “My computer suddenly got incredibly slow.” The moment you open File Explorer, you see it right away – the C: drive highlighted in red with only a few gigabytes free. Before you bring it to us for diagnostics, let’s look at how to deal with a full disk at home. Sensibly above all – no frantic deleting of files you don’t understand.
Why does the C: drive fill up even when you’re not saving anything to it? Windows 11 keeps a detailed update log, holds onto the previous system version in case you need to go back, maintains application caches, and most importantly – Windows Update downloads and unpacks huge installation packages. Add to that restore points, temporary browser files, or copies of photos you’ve accidentally synced locally. Within a few months, 30–60 GB more is suddenly occupied without you even knowing how.
About the screenshots: the images are from an English installation of Windows 11 (our test machine). Microsoft occasionally changes names between versions, so treat them as a guide.
Quick steps if you want to start right away
- Open Settings → System → Storage and see what’s taking up the most space.
- Run Disk Cleanup and, crucially, click on Clean up system files.
- In WizTree or TreeSize Free, check whether space isn’t being eaten by a specific folder in
C:\Users,Downloads,AppData, or cloud sync. - If you use OneDrive, turn on Files On-Demand and free up locally downloaded files.
- Only disable hibernation if you knowingly don’t use it. Never manually delete the
C:\Windows\WinSxSandC:\Windows\Installerfolders.
Before you start deleting anything: find out what’s eating your space
This is the moment most guides fail – they advise cleaning blindly. In the repair shop, the very first thing we do without exception is a visual disk scan. In seconds, we see a map of every folder and it’s instantly clear where the space is going – like tens of gigabytes accumulated in the cache and temporary application data deep inside the hidden C:\Users\…\AppData folder (yes, that happens too). Without such a map, you’d spend hours hunting for these hidden space hogs.
Download WizTree (free, portable version available – no installation needed) – it’s the fastest because it reads the file system table directly. TreeSize Free works as an alternative. Run it as administrator, select the C: drive, and within seconds you’ll see a colorful treemap of rectangles. The larger the rectangle, the more space the folder or file occupies. Clicking any block instantly shows you the exact path, and you can decide whether it’s something you really don’t need.
A simpler but rougher overview is also offered by Windows itself: Settings (Win + I) → System → Storage. At the top, you’ll see a colored bar divided into categories (Apps, Temporary files, Documents, System…) and after clicking Show more categories, you’ll see what’s taking up the most space. It’s enough for a quick look; but for tracking down a specific space hog deep inside folders, WizTree is in a different league.
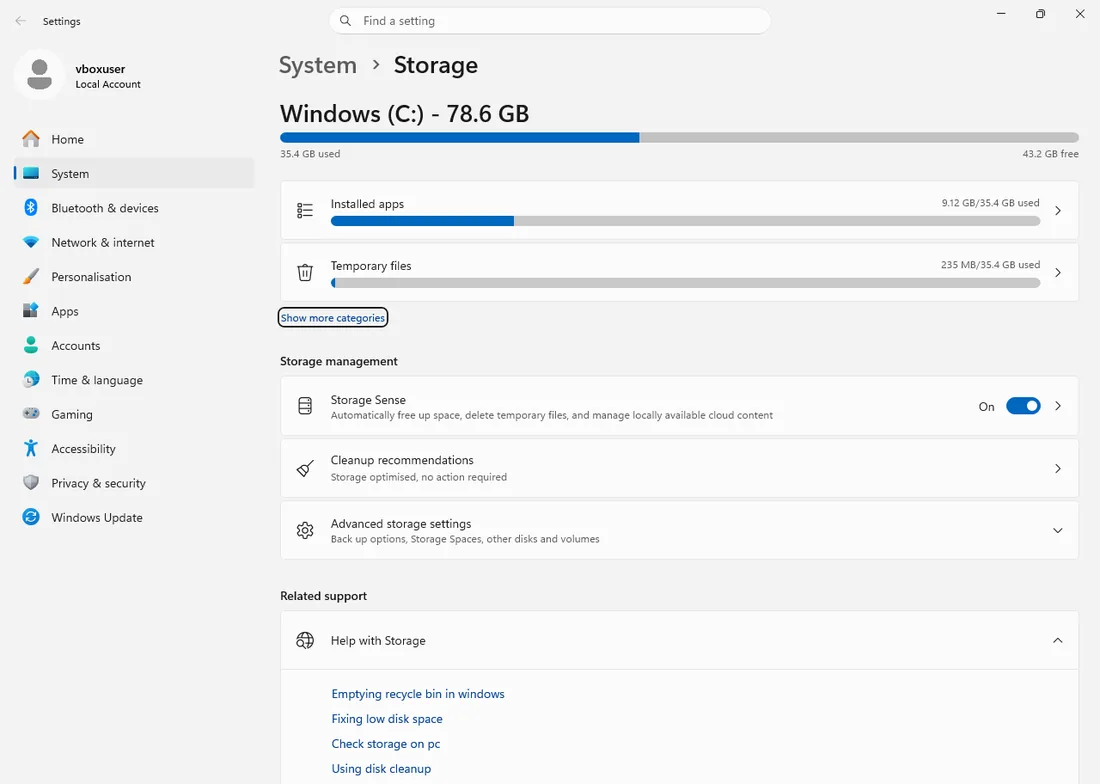
Only now, when you know what’s actually on the disk, does systematic cleaning begin. Let’s start with what can’t break anything and gradually work up to more advanced methods.
Quick and safe methods (for everyone)
You can handle these steps in five minutes and there’s practically nothing you can mess up. These are exactly the procedures we do as the first routine step in the repair shop.
Storage Sense – automatic cleaning you can forget about
Windows 11 has a built-in tool that monitors temporary files and the contents of the Recycle Bin for you. It’s worth turning it on once and letting it run in the background.
- Open Settings (Win + I) → System → Storage.
- Turn on the Storage Sense toggle.
- Click on the Storage Sense row for detailed settings:
- Run Storage Sense: choose Every week – a longer interval isn’t practical, a shorter one deletes files too aggressively.
- Delete files in my recycle bin if they have been there for over: we recommend 14 or 30 days. Sometimes, someone deletes something by accident, and after two weeks, they can still recover it.
- Delete files in my Downloads folder if they haven’t been opened for more than: be careful here. Many people keep important installation files or forms in Downloads. If you regularly sort through the folder, feel free to set 60 days. If not, leave it at Never.
- At the very bottom, click Run Storage Sense now to perform the first cleanup immediately.
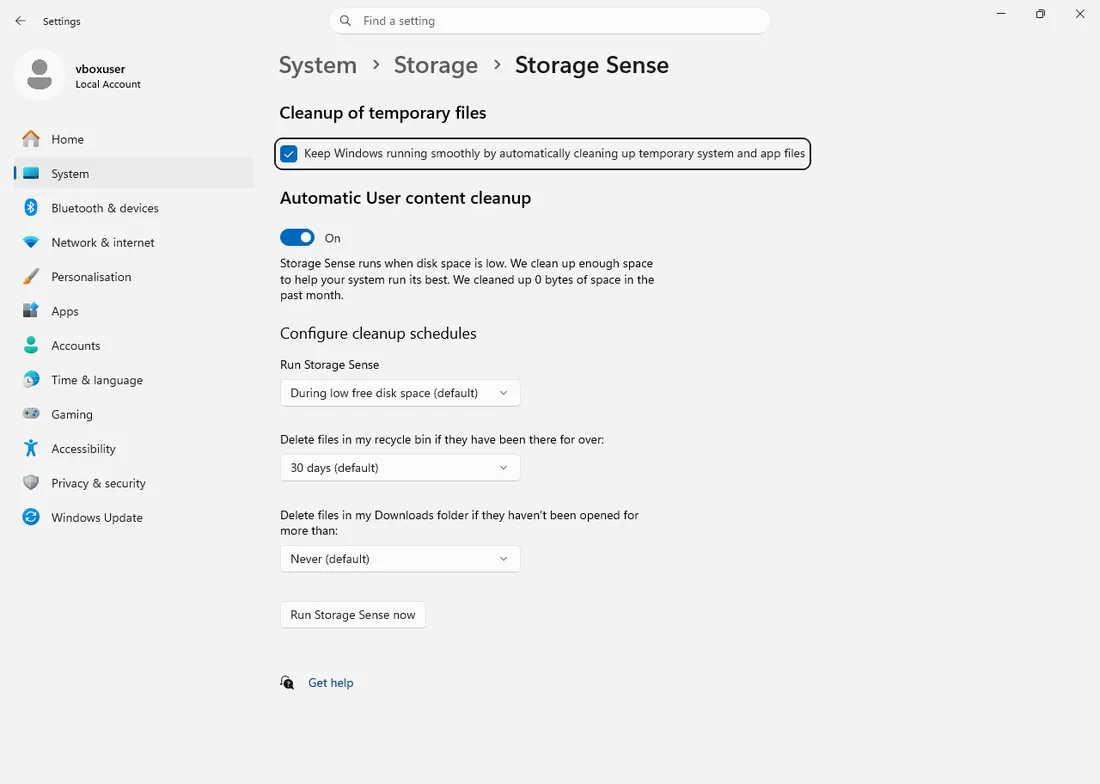
Typical gain: 3–15 GB, depending on how long it’s been since you last deleted anything.
Disk Cleanup (cleanmgr) – the real cleaner, not just cosmetics
The Disk Cleanup tool has been in Windows for twenty years and still works great. However, most people skip the most important step – the system files button.
- Type Disk Cleanup into the taskbar search and launch the app.
- Select drive C: and click OK. After a moment, a table with items appears – nothing major yet, usually a few hundred megabytes.
- This is the crucial step: click the Clean up system files button (bottom left, requires administrator privileges).
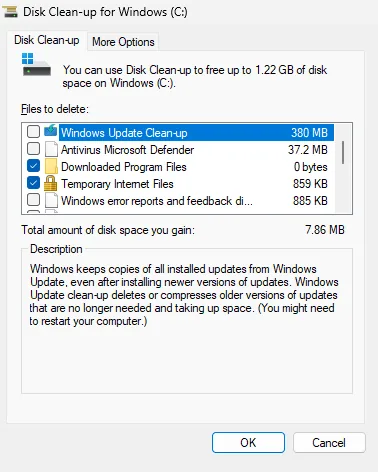
- Select drive C: again and click OK. This time, after loading, many more items will appear, each showing the amount of data. Go through these categories:
| Item | Explanation | Recommendation |
|---|---|---|
| Windows Update Cleanup | Old versions of updates the system no longer needs. | ✅ Definitely delete. Typically 1–8 GB. |
| Previous Windows installation(s) | The complete old system version after upgrading to Windows 11 (Windows.old folder). | ✅ If the computer has been running problem-free for over 10 days, delete it. Typically 20–40 GB. |
| Windows Setup temporary files | Unpacked installation packages, especially after major updates. | ✅ Delete. Easily 5–15 GB. |
| Windows upgrade log files | Logs from installations. | ✅ Delete, they don’t take up much space. |
| Delivery Optimization Files | Files downloaded for sharing updates with other PCs on the network. | ✅ Delete if you don’t need to distribute updates to other computers. |
| Recycle Bin | Emptied contents of the bin. | ✅ If you’ve already emptied it, it’s empty. Otherwise, check if anything important isn’t in there by mistake. |
- Check the items you want to clean (feel free to check all of the above) and confirm OK → Delete Files.
Typical gain: 10–50 GB. This is by far the most rewarding safe method. We start almost every repair shop intervention with it.
Uninstalling unused apps
Start Menu → Settings → Apps → Installed apps. Click the Sort by filter and choose Size (largest to smallest). You immediately see which programs occupy the most space on the disk.
What you typically find:
- Old games you finished a year ago.
- Pre-installed bloatware from the laptop manufacturer (trial antivirus versions, promotional apps).
- Apps you don’t even know you have installed (e.g., an older Office version alongside a newer one).
Uninstall them one by one. For some applications (especially games), you’ll see sizes of 50 GB or more – those are clear candidates for freeing up space.
OneDrive – Files On-Demand
If you use OneDrive (whether personal or via Microsoft 365), look at the cloud icon in the notification area. Files On-Demand can keep most of your folders only in the cloud, with just a small placeholder file on the disk.
- Right-click the OneDrive icon → Settings → Sync and backup tab → Advanced settings → at the very bottom, Files On-Demand → the Free up disk space button.
This instantly converts all locally downloaded files to online-only mode. You’ll still see them in File Explorer, but they’ll have a cloud icon in the Status column. When you open them, they’ll download only at the moment you need them.
Typical gain: 10–100+ GB, depending on what you have synced. For Microsoft 365 users with 1 TB of space, this is often the most significant saving.
Intermediate methods (big gains, but require thought)
These procedures require at least a little confidence. They’re not dangerous when you know what you’re doing, but they’re not just a single click in Settings either.
Disabling hibernation and deleting the hiberfil.sys file
The hiberfil.sys file in the root of C: is used to save the contents of RAM to disk during hibernation. Its size is roughly 40–75% of your RAM size. If you have 16 GB of RAM, hibernation blocks 6–12 GB on your disk.
Difference between Sleep and Hibernate:
- Sleep: the computer goes to sleep, but RAM remains powered. Waking up is instant, power consumption is minimal. Suitable for laptops connected to power or desktop PCs.
- Hibernate: RAM contents are written to disk, and the computer completely shuts down. When turned on, the contents are restored. The main advantage was for older laptops with a dead battery – today, with fast SSDs, starting the system from a powered-off state is often faster than restoring from hibernation.
If you don’t actively use hibernation (and most people don’t use it or even know about it), you can safely disable it:
- Press Win + X and select Terminal (Admin) or Command Prompt (Admin).
- Type exactly:
powercfg -h off - Press Enter. No output will appear, but the
hiberfil.sysfile will immediately vanish.

When not to disable hibernation: If you have a laptop and knowingly use the hibernation function (e.g., you put work aside for the weekend without a charger and want to return exactly to where you were), leave it on. We recommend everyone else disable it.
Typical gain: 6–15 GB directly in the root of C:.
Limiting the size of system restore points
System Protection can be a silent eater of tens of gigabytes. Restore points are created before driver installations, Windows Update, or manually, and each takes up several GB. By default, Windows can keep so many of them that it uses up the set limit (often 3–10% of the disk, but on large disks, that can easily be 50 GB).
- Type Create a restore point into search and open the System Protection dialog.
- On the System Protection tab, select drive C: and click Configure.
- You’ll see the current space usage. Use the Max Usage slider to set a reasonable value – for most users, 5–10 GB is plenty (about 2–4 restore points).
- If usage is high and you want to free up space immediately, click Delete – this will delete all restore points for that drive. Don’t try to keep any – the function deletes all of them, not just old ones.
- Confirm OK.
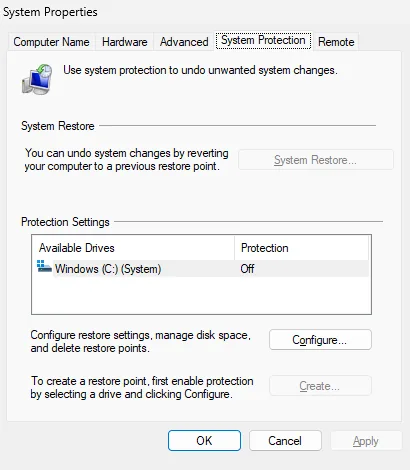
After deleting the points, we recommend immediately creating one new one manually: back in the System Protection tab, click Create, name it, and confirm. You’ll then have at least one fresh restore point for emergencies.
Typical gain: 5–40 GB.
Moving user folders to drive D:
Prevention that changes your life if you have two drives in your computer – a small SSD for the system (C:) and a large HDD or second SSD for data (D:). The Documents, Pictures, Videos, Music, and Downloads folders belong on the data drive.
- Open File Explorer and go to
C:\Users\[your_username]. - Right-click the Documents folder → Properties → Location tab.
- Click Move…, select the target location on drive D: (e.g.,
D:\Documents), and confirm Select Folder. - Windows will ask if you want to move all files from the old location to the new one – answer Yes.
- Repeat for the Pictures, Videos, Music, and Downloads folders.
From now on, all your data is saved to D:, and the system drive C: only fills up with system matters.
Typical gain: tens of GB immediately, tens of GB in the future.
Advanced methods (for the more technically inclined)
The following methods involve system folders. There’s one ironclad rule in Windows: what you didn’t create yourself or what isn’t in C:\Users, it’s better not to delete directly. Everything has its official cleanup mechanism.
Cleaning WinSxS – a component store, not garbage
The C:\Windows\WinSxS folder is a frequent target of misunderstanding. It shows tens of GB in File Explorer, but that’s not the real disk space used – Windows uses hard links, so one file appears to be in multiple places but is physically on the disk only once. Microsoft therefore recommends assessing the actual size via Dism.exe /Online /Cleanup-Image /AnalyzeComponentStore, not just by File Explorer. WinSxS is a repository of all versions of system components so they can be repaired, updated, or rolled back. Never, truly never, delete the contents of WinSxS manually.
Safe cleaning is performed by the command:
- Win + X → Terminal (Admin).
- Type:
Dism.exe /online /Cleanup-Image /StartComponentCleanup - Enter and wait (it takes a while; it looks like nothing is happening – that’s normal).

This command removes superseded previous versions of components that are no longer needed. This is Microsoft’s official procedure for cleaning WinSxS.
An even more aggressive variant – warning: the /StartComponentCleanup command supplemented with /ResetBase can free up to several GB more because it merges all currently installed updates into an inseparable whole. Once completed, you will no longer be able to uninstall existing installed update packages; however, according to Microsoft, future updates are not blocked by this. For the average user who never uninstalls updates anyway, it’s usually safe and beneficial, but it is an irreversible step.
Dism.exe /online /Cleanup-Image /StartComponentCleanup /ResetBase
Typical gain: 2–8 GB (real savings, not what File Explorer shows).
The C:\Windows\Installer folder – patching, not deleting
This folder contains installation packages (.msi, .msp) for all programs installed using Windows Installer technology. They are essential for repairing, updating, and uninstalling applications. If you delete the folder, a third of the programs on the computer will break and cannot be uninstalled or updated.
Nevertheless, orphaned files accumulate in it – old patch versions that no installed program needs anymore. The PatchCleaner utility (freeware) is designed for their safe removal. It compares the contents of C:\Windows\Installer with the database of installed products and can move orphaned files to quarantine. If nothing breaks within a week, you can permanently delete them. Always use the quarantine move, not immediate permanent deletion.
Never delete this folder manually, nor try to select individual files in it without a tool that verifies their dependencies.
Typical gain: 2–10 GB (on older installations with many programs).
Leftovers in C:\ProgramData
C:\ProgramData is a hidden folder (you’ll see it in File Explorer only if you have hidden items showing enabled) where programs store their data independently of the user. After uninstalling a program, its folder with settings, logs, or cache often remains here.
Browse the contents in WizTree – if you see a folder there named after a program you uninstalled long ago, you can delete it. Typical examples are old antivirus folders (often hundreds of MB), game launcher caches, or editing programs. Always verify first that you really don’t have the program on the computer – the folder name might not be immediately obvious, so better to look it up.
Conclusion and prevention
Usually, you’ll free up the most space right in the first two steps – cleaning system files and analysis via WizTree reveal the problem immediately. For a better overview, we summarize:
| Method | Typical gain | Difficulty | Risk |
|---|---|---|---|
| Cleaning system files | 10–50 GB | Low | None |
| WizTree + manual cleanup | 10–100+ GB | Moderate | When deleting unknown content |
| Uninstalling apps | 5–100+ GB | Low | Low |
| OneDrive Files On-Demand | 10–100+ GB | Low | None |
| Disabling hibernation | 6–15 GB | Low | None if hibernation isn’t used |
| Limiting restore points | 5–40 GB | Low | You lose the ability to revert the system |
| Moving folders to D: | Permanent prevention | Moderate | None |
| DISM /StartComponentCleanup | 2–8 GB | Moderate | Low |
| PatchCleaner | 2–10 GB | Higher | Moderate (low when using the tool) |
Future prevention:
- Set Storage Sense to weekly automatic cleaning and forget about it.
- Run Disk Cleanup with system files once every six months.
- Save all your data to drive D:, if you have one.
If you’ve gone through the entire guide but still don’t have enough space for normal work (or the computer is still slow even after cleaning), it’s time to consider replacing the SSD with a larger and faster model. Today’s NVMe drives are orders of magnitude faster than older SATA SSDs, and 1 TB models can be had at a reasonable price. If you don’t dare do the replacement yourself – whether it’s cloning the system or the physical installation – stop by our PC repair service in Brno. We’ll swap the drive, transfer your system, and you’ll be set for a few more years.
Frequently Asked Questions
Is it safe to delete the Windows.old folder? If you upgraded to Windows 11 more than 10 days ago and the system is running without issues, yes. The folder only exists for rolling back to the previous version of Windows. Deleting it via the “Clean up system files” button in Disk Cleanup won’t break anything.
Can I delete the WinSxS folder? Definitely not manually. WinSxS is a system folder containing Windows components, and deleting it will irreversibly damage the system. Moreover, its size appears inflated in File Explorer due to hard links – it actually takes up less space than shown.
How much space does Windows 11 need for normal operation? A minimum of 64 GB of storage, according to Microsoft’s requirements. For comfortable use, however, plan on at least 30–50 GB of free space so the system has room for updates, temporary files, and the page file.
Why is my C: drive full even though I don’t save anything to it? The most common culprits are restore points, previous Windows installations, Windows Update temporary files, browser and application caches, and cloud data synchronization. Run WizTree as an administrator – you’ll see the answer in seconds.
Will cleaning the disk speed up my computer? Indirectly, yes. A very full SSD can slow down because it has less space for efficient data allocation and wear-leveling mechanisms (garbage collection, TRIM). But if the drive is healthy and just full, after cleaning, you’ll notice it mainly in responsiveness when working with larger files.
Rather not deal with it yourself?
Book a diagnosis in Brno — you get the price up front and we start only once you agree.
Where to find us
We are a PC and laptop repair shop in Brno-Židenice: diagnostics and repairs of computers and laptops, data recovery from drives, and out-of-warranty Apple repairs (iPhone 12 and newer, MacBook, iPad).
Viniční 3587/216, 615 00 Brno-Židenice, Czech Republic Mon–Fri 10:00–16:00
Call +420 774 777 774 Computer repair and laptop service in Brno
We put the repair price in writing after diagnostics and carry on only once you agree.